Showing posts with label sewing for women over 50. Show all posts

Wednesday, July 24, 2013

Project 3-1: Pattern Adjustments to my Orange Sherbet Dress

This is a pretty easy, straightforward pattern, but of course, I will need to make these adjustments first when I cut out my fabric:


Bodice Shoulder

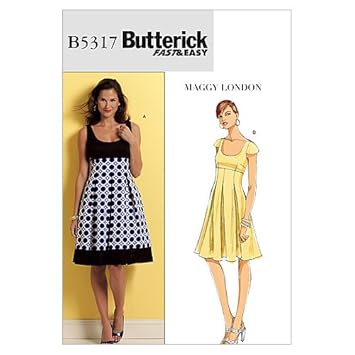
NOTE:  If you are not familiar with sewing a fitted bodice, I would suggest sewing the bodice first using a piece of muslin so you get the proper fit before cutting your good fabric. 

Like many women who've worked on computers or done other close work their whole life, I have a slight forward shoulder hunch.  If your bodices tend to gape open in the front, you probably have a shoulder hunch as well.

There are several fixes for this:

1)  Make a dart in the front on either side of the bodice that takes in the pucker.  If your fabric is a solid color you will be able to see the darts easily so make sure they are evenly matched. 

2) Take an 1/2" - 1 1/2" at a diagonal on the shoulder front (the shorter end of the diagonal should be towards your neck ) and ADD the same amount to the shoulder back--I stuck a post it note to the bodice back (the longer end of the diagonal should be against your neck).  It's incredible how this slight adjustment can make a difference in the fit!

Front bodice is on the left, back bodice is on the right
 3) I will also be discussing doing a full bust adjustment (or FBA) for women with a fuller bust.  Generally patterns are made for B cup women...and this tutorial that I will be posting shortly will give you the fullness you need in the bust, as well as add inches to the side.  Stay tuned!

Bodice and Skirt

My pattern is a size 14 but I need a 16-18 pattern.  If you look at the back of the pattern, a size 14 waist is 28" but I need a 32" waist.  So here are my calculations to make this pattern fit:

1)  I subtracted the pattern waist size (28 inches) from my waist size (32 inches) and divided by 4
(4 equals the two front side seams and two back side seams). 

       32       -         28              =          4       divided by        4         =         1 inch
 (my waist)    (pattern waist)       (answer)                   (4 seams)     (add to each seam)
 
I added 1" to each of the side seams.

Hem

I took off 2" from the length because I am not as tall as the pattern model.

The Fringe for the Sleeves and Hem
I pinned a bit of fringe on the bottom of the fabric to get an idea of what it will look like on the hem, and I think it will be very cute!

I think I will also add fringe to the cap sleeves--which means I need to make a slight adjustment.  The directions are to fold the sleeve in half and sew it to the bodice, thus eliminating the need for a hem. My adjustment is this:  when I cut the sleeve out, I will add a 1/2" seam allowance to the bottom of the sleeve, sew the fringe to the bottom of the sleeve and then sew the sleeve and the facing at the hem.  Voila!

By the way, I couldn't resist, I am so excited about making my dress, I found a hat to match!  Now, doesn't this remind you of maybe something that Princess Di would wear? Isn't that exciting about the new royal baby?!

Contrast Trim Organza Hat - Orange

Saturday, July 6, 2013

Project 2-2: Sewing Tips for Burnout Velvet Fabric

This is the first time I've ever used burnout velvet fabric...and here's the previous post about my 2nd fabric stash challenge.

It's pretty cool how burnout fabrics are made:  this process, called Devore ("devoured" in French) was developed in the 1920's.  A chemical gel containing sodium hydrogen sulphate is applied to the fabric in patterns on velvet fabric.  The gel dissolves the fibers, leaving the fabric base (make of protein fibers) behind.

The black parts in this fabric doesn't have the fibers in them and so they are see-through.

Here are examples of lovely burnout velvet dresses, btw.

S A L E   Midnight.. Vtg 80s Burnout VELVET Zebra Dress


vtg 90s dress // plum floral burnout VELVET MINI dress body con // S c822

I think this fabric looks romantic and Stevie Nicks-ish...and the fabric is very stretchy!  This particular burnout velvet is like spandex, it's stretchy in either direction, with great elasticity (coming back to its original shape).  If I had more of this fabric, I would love to have made a loose, pleated, empire waist style dress like this.


I love that this fabric can be hand washed and hung up to dry and it's virtually wrinkle free.  Plus, it will be so comfortable to wear (my favorite characteristic!)


Nap, Pinning and Cutting Out

Essentially, this fabric feels different when you rub it (the raised fibers point in one direction).  So, be mindful to lay the pattern pieces in the same direction...otherwise your garment will be different shades.  I've learned from experience!

Also, ensure you get all the wrinkles out of your fabric before you pin down your pattern pieces.  This particular fabric was more challenging because of how stretchy is. After I cut the fabric out, I unpinned each piece and layed it back out flat.  Then I layed the pattern piece on top and trimmed the edges, if needed.  I was surprised how off some of the cut pieces were!


Needle type
Because this fabric is uber stretchy, use a needle for stretchy fabric or you will have skipped stitches.

Sewing 5/8" hems
This pattern has a lot of 5/8" hems on the neck, sleeves and bottom.  I initially thought, no problem!  I tried to serge the edges and then fold over 5/8".  No dice, the fabric was too stretchy to sew on my serger--although I'm sure a commercial serger would have done the job.

The pattern suggested ironing down a 5/8" hem and then opening the hem out and folding the raw edge in.  So I followed this instruction, but without the ironing part. At that point, I tried to sew the hem on my sewing machine.  Again, another disaster. The fabric was all over the place and the hem came out jagged.  Awk! Plus, pulling the stitches out took forever!  The fabric is "spongy" and the stitches were hidden in the velvet fibers.

So I suggest hand sewing the hems first, and then sewing them on the sewing machine, but right side up.  One bright note though, the regular seams are a lot easier to sew than the hems, just make sure to pin them a lot before sewing them!

Ironing
Because this is a velvet fabric, I would not suggest ironing it at all.  I don't think this fabric is really going to need it, anyway.

Lining
Yes, we're back to that again, aren't we?  Well, I mulled this over and the bare parts of the fabric you can see through pretty easily.  So, I lined the skirt part with some black stretchy fabric.

I'll post photos of my finished dress shortly.  So, have you had experiences sewing burnout velvet fabrics?  Also, do you have tips on how to sew this fabric more effectively?